FAQs
Frequently Asked Questions About Your Flair and Extras
FAQs Before You Purchase a Flair
Q: What is the difference between the Flair and other popular products, such as the Aeropress?
A: The espresso process requires a minimum of 6-9 BAR pressure to effect emulsification. This is a key component to production of crema and to extract the soluble and insoluble compounds that contribute to the unique body and flavor of espresso. Aeropress and other similar small hand brewers generate far less pressure than what’s required for espresso. The Flair’s lever system is more than capable!
Q: What is the difference between the different Flair models?
A: Our Flair models, while all coming from the same basic lever design and materials, differ in price and components to cater to all those that wish to brew espresso, from beginners to professionals, and everyone in between. To learn more about the differences between our models, please visit our Buyers Guide.
Q: What’s the best grinder to use with the Flair to get good crema?
A: The Royal Grinder, by Flair Espresso of course! Click here to learn more.
In general, it is essential that you use a burr grinder. Stay away from blade grinders as they do not let you control the grind size, which is essential for making espresso. It is very difficult to produce a good shot of espresso from coffee beans that have been ground in a blade grinder, unless using the flow-control portafilter that comes standard with our NEO.
Q: Does the Flair come with a warranty?
A: Yes, the Flair comes with a limited warranty. Please click here for full details.
FAQs Before Using Your Flair
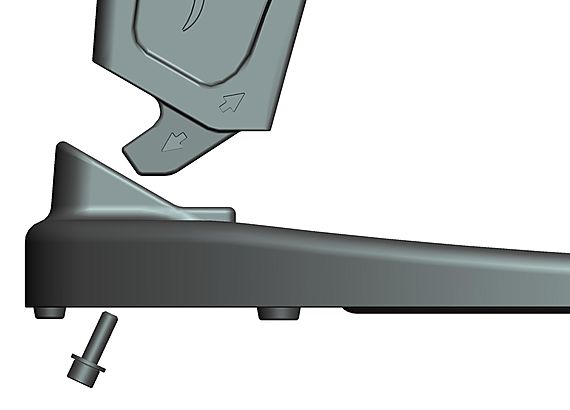
Q: How do I bolt the main piece to the oval base?
A: The Flair was designed to be used with or without the bolt. You should bolt the main piece to the base only if you do not expect to travel with the Flair often. If you leave the Flair permanently assembled and you want to bolt the base to the main piece, first you need to make sure the bottom tab of the main piece is all the way in the base. You can tap the top of the main piece with something soft (rubber, plastic, wood) to ensure it sticks to the base. Then flip it upside down and insert the bolt. It screws in a bit tilted in the beginning. Again, don’t bother using the bolt if you plan to take the Flair apart frequently. Please see the image below for the appropriate angle for bolt insertion.
Q: How coarse, or fine, should my grounds be when using the Flair?
A: The coarseness of your grounds will depend on many things, such as the specific bean and dose you are using, as well as the amount of preheating, temperature of brew water, tamp force and pressure applied. However, beans used in the Flair – and other espresso machines – must be ground more finely than for use in a drip coffee machine. If you do not see any crema when brewing, try to grind your beans increasingly finer and/or dose higher until you get the taste and flavors you desire. Remember, if you can’t lower the lever without a significant struggle, you’ve ground too fine (please see FAQ #13 for how to safely handle a “pressurized brew head”).
Q: How much should I preheat the brewing components? Which ones need pre-heating?
A: Pre-heating the cylinder is essential to temperature stability. Fill the cylinder with boiled water and pre-heat for at least 30-45 seconds before brewing. If you’ve purchased the stainless-steel piston, this should also be pre-heated. Finally, pre-heating your cup with hot water can keep your beverage warmer longer!
Q: What’s the recommended dose for espresso?
A: Flair baskets are “choose your own adventure,” or rather espresso. The maximum dose is whatever you can pack in the portafilter while allowing space to set the dispersion screen. The minimum dose will be dependent on how low you can go while still generating sufficient resistance to build back-pressure in the system (6-9 BAR). Note that the PRO and PRO 2 portafilters do have a tapered lower section that requires you to fill the baskets with enough coffee grounds to ensure a firm tamp; typically you’ll need a dose of between 14-16 grams for this, but it will vary by coffee selected.
FAQs After Using Your Flair
Q: Why is there almost no pressure or resistance when I lower the lever and/or the brewing takes only a few seconds?
A: If there is no pressure or resistance, it is most likely that your grounds are too coarse and/or your dose is too low. Re-grind your beans to be finer and/or dose higher, and ensure you have good distribution of the grounds and an even surface. If you have purchased pre-ground beans, please remember these will not work in our non-flow control portafilters. Also please note, it is our experience that many budget burr grinders, even on their finest setting designated “espresso”, will not grind fine enough to be used with non-flow-control baskets.
Q: How do I know that the pressure, or the force I put on the lever, is right without a pressure gauge?
A: You usually know you have the right force when you pull the shot between 35-45 seconds while feeling a moderate amount of resistance in the lever. You can also place the Flair on a bathroom scale and pull a shot as you normally would. With the NEO and Classic (not equipped with a gauge) a good average is about 30-40 lb. of force on the lever sustained for the entire brew period. If you are using our pressure gauge, be sure to never brew in the black! If you can’t pull your shot and there is too much resistance, place your free hand on the cylinder to hold it down while you release force on the lever. Start again, this time grinding more coarsely.
Q: If the Flair makes a double shot espresso, why is the shot so small?
A: There are two ways to measure a double shot, by volume and by ratio. When we say “double shot espresso,” we are basing that on the new standards that use brew ratios to describe yields e.g. 32-40 ml of espresso from 16-20 grams of coffee on average. To learn more about brewing ratios, please check out this informative video by one of the kings of espresso, James Hoffman.
Q: My pressure gauge is turned in a position that is difficult to see while I’m brewing the shot. What should I do?
A: The gauge is user adjustable. First, ensure your gauge is finger tightened until it feels snug with stem, then proceed to turn it counterclockwise until it provides a good viewing angle. Do not unscrew the gauge more than a ¾ turn.
Q: I pulled a shot and the Cylinder on my Brewing Head is lifting up, or there is seepage from between the cylinder and the portafilter. What’s going on?
A: It is normal to see the cylinder lifting by as much as 2 mm towards the end of the shot. Coffee spilling/leaking in between the cylinder and portafilter should not happen. Please ensure the following:
- Never abruptly release active force on the lever while the gauge reads above 2 BAR. Ensure that you are filling the chamber completely, leaving no air in the chamber.
- Always fill the chamber completely, leaving no air inside. Air will compress at the start of the pull and will therefore decompress at the end—this can cause a spring-like action that thrusts the cylinder up.
- If brewing by weight, and stopping the pull while pressure is still high and water is still in the chamber, use your free hand to hold the cylinder down while releasing the lever.
Q: Why is there coffee spurting from the portafilter when I start to pull my shot?
A: If the squirts are small and last no more than a second or two, this is a normal part of naked brewing. Remember, the bottomless portafilter is a diagnostic tool to help you understand how even your extraction is. This “jet effect” can indicate one of two things: first, a partial occlusion of one of the openings in your filter basket, or second channeling in your puck. While there is little to do to fix a partial occlusion besides modifying your grind size, channeling occurs when there is uneven distribution of your grounds and brew water flows through one area faster than others. This can be solved by good distribution techniques, pre-infusion, slow ramps to pressure and lower over-all pressure while brewing.
Q: How do I clean my Flair after use after I’ve brewed?
A: You can remove used grounds, known as the puck, in a few different ways. We recommend knocking the portafilter against the side of a trashcan or knock-box to remove the grounds. This should be done right after brewing. If the grounds are hard to remove, use a utensil like a spoon to dig them out. Once the grounds are removed, rinse all pieces in cool water. No soap is needed, and it can impact your espresso’s taste! From time to time, consider flushing your Flair by following the brewing process, but only use cold water and no coffee!
If you still have questions please contact us via the form below.