Espresso Guide
Advanced Brewing Techniques for Your Flair Espresso Maker
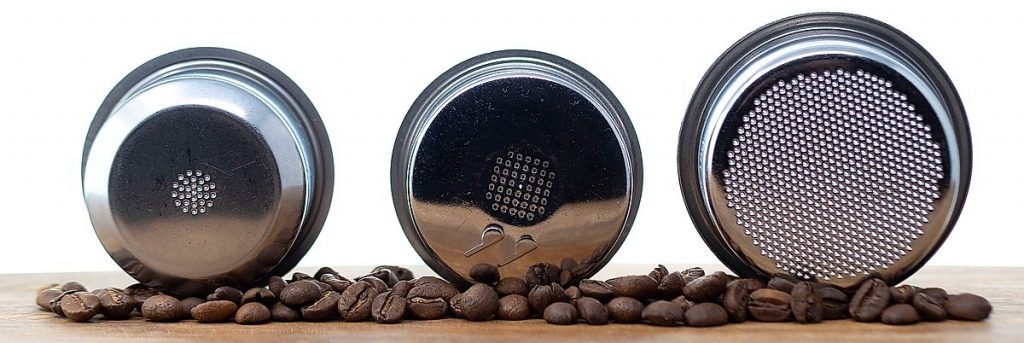
Budget espresso machines typically use flow control (aka pressurized) baskets or portafilters that both mechanically build pressure in the basket to increase contact time and aerate the stream to enhance crema. Non-pressurized baskets and portafilters, such as you find on the Flair Classic, Signature and PRO 2 models, as well as commercial espresso machines, require you to properly grind, dose, distribute and tamp in order to achieve the resistance needed to brew with 6 – 9 BAR pressure. Being off by even a little bit will yield poor results when you introduce pressure to the system.
The size of your grounds determines the amount of surface area, which dictates how short or long the contact time needs to be to properly extract the coffee (all else being equal). Additionally, a grinder with too few adjustment points will prevent you from targeting the optimum particle size. You will need 60 or more adjustment points to obtain a good result, and the more the better.
As coffee ages, it loses the CO2 generated in the roast process that is chiefly responsible for crema. Always try to extract coffee that has been roasted within days or weeks, rather than months, for the best flavors and most crema. When you grind your beans you are fracturing the cell walls that hold in CO2 and other volatiles from the roast process. For best results, you should only grind your freshly roasted coffee just before it will be extracted. Every minute counts as you set the clock ticking on aroma and CO2 loss once you fracture those pockets, as well as the onset of oxidation.
Brewing with the Pressure Gauge
Brewing time should typically be between 35-45 seconds at 6-9 BAR pressure, sustained. Light roasts might require even more time for proper extraction, as well as an 8-15 second pre-infusion to prepare the bed of coffee beforehand. Everything starts with the grind and dose, which creates the optimum resistance to achieve desired pressure and brewing time. Use the Brew Chart below to adjust your grind and dose appropriately so that you can target your ideal pressure and time.

Brewing Naked or Bottomless
The Classic, Signature and PRO 2 user has the option to brew “naked” or “bottomless” by removing the included spout. Brewing without the spout provides an unobstructed view of the filter screen where the extraction happens. With the help of a small compact mirror, ideally with 3-5x magnification, you can easily observe the extraction as it occurs. This is vital information for determining the evenness of extraction across the entire coffee bed; a spouted portafilter hides this information.
If you observe regions that are significantly lighter or darker than the average, you have areas of over and under extraction relative to the whole. This suggests that there may have been issues with your distribution or tamping for that given shot, and that brew water has flowed more easily through some parts of the coffee bed than others due to channels opening up under pressure.
When channels open up, allowing water to flow faster in a localized area. These higher velocity streams, relative to the average flow through the cake, usually result in sprays or sprites emanating from the underside of the filter screen. If you have the spout attached, you won’t notice these forming. Brewing bottomless, however, you will notice these very quickly as they spray your counter and anything within reach.
Another source of these unwanted occurrences is partial blockage of one or more of the filter holes by bean fragments. Consider the following example. You’re out in your yard, and place your thumb over the perfectly round end of your garden hose, partially occluding the exit. As a result you increase the pressure, velocity and trajectory of the stream. This phenomenon is good for the garden, but not for brewing bottomless. There’s little we can do about partial occlusion, but channeling can be combated with good distribution techniques and pre-infusion.
TIP: if a jet of coffee occurs, a subtle but momentary decrease in pressure is sometimes enough to either dislodge the material or collapse a formed channel.
Pre-infusion with your Flair
Pre-infusion is the act of saturating the coffee cake with brew water at a low pressure, typically around 1-2 BAR, for a short period of time, usually 8-10 seconds, before ramping to full pressure. The goal is to evenly soak the entire puck without kicking-off extraction which would be categorized by a measurable accumulation of extracted beverage in the cup. By doing so, you can achieve higher extraction rates and minimize the occurrences of channels forming in the coffee bed when higher pressure is later applied.
By monitoring the filter basket from below while brewing bottomless, you can accurately control the low-pressure pre-infusion and prevent extraction from occurring by backing off the lever when you see the first drops beginning to push through the filter. To introduce pre-infusion into your brew, slowly pull the lever down until 1-2 BAR is reporting on the gauge, then modulate the active force to keep it there for the remainder of time you are targeting. Once you have reached the desired pre-infusion time, move forward with extraction as normal. If you are unable to hold back flow for the desired time, grind finer until you can.
It’s important that you do not abruptly release the lever or active force in between pre-infusion and extraction phases: Simply apply low-pressure, hold or modulate as needed, then ramp to high-pressure and complete the pull. For the o-rings installed inside the cylinder to engage and seal against the portafilter, the commencement of the pull must be marked with a constant and firm force on the lever. Should the forces applied to the lever waver or diminish significantly e.g. pumping the lever, the cylinder may rise up in an attempt to release pressure through expansion of the brew head, and result in separation of the brew components. NEVER PUMP THE HANDLE. If you do not wish to include a pre-infusion in your brew, we recommend a slow ramp up from “0” to your desired brew pressure. Always continue in the direction of the pull once you have started.
Pressure Profiling with Your Flair
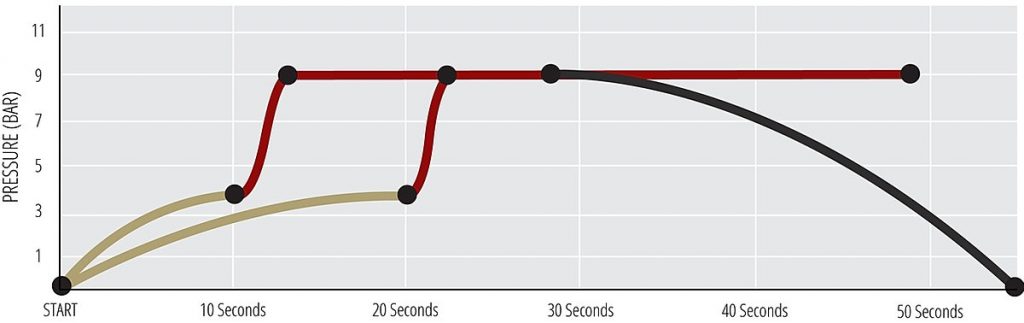
You can use your pressure gauge to utilize pressure profiles that mimic other machines, from other lever-based machines to high-end modern pumps with customizable pressure profiling capabilities. As you pull the shot, you can ‘draw’ the pressure out accurately against the time axis with the help of a timing device such as your phone, watch or a coffee specific scale that includes a timer.
Two examples of possible profiles to try are shown below. One is similar to a conventional straight 9 BAR pump machine while the other is similar to a standard lever machine. Using a timing device, attempt to hit the pressure changes at the appropriate time. Note that in both of these examples, there is a slow ramp up of pressure before peaking at 9 BAR. It is believed that the act of ramping slowly, as opposed to immediately hitting peak pressure, achieves higher extraction yields. You will discover that you can grind finer while achieving the same brew times as you would with a straight to peak pressure profile using a coarser grind. The ability to grind finer is particularly useful when trying to achieve a higher extraction with lighter roasts, which typically are a challenge to find the right levels of sweetness, acidity and body one is hoping for in an espresso.